Eyebrow Shaping Tips for Your Face Shape
Discover the best brow shapes for oval, round, square, heart, long, and diamond faces, plus mapping, grooming, and pro tips for soft, balanced arches.
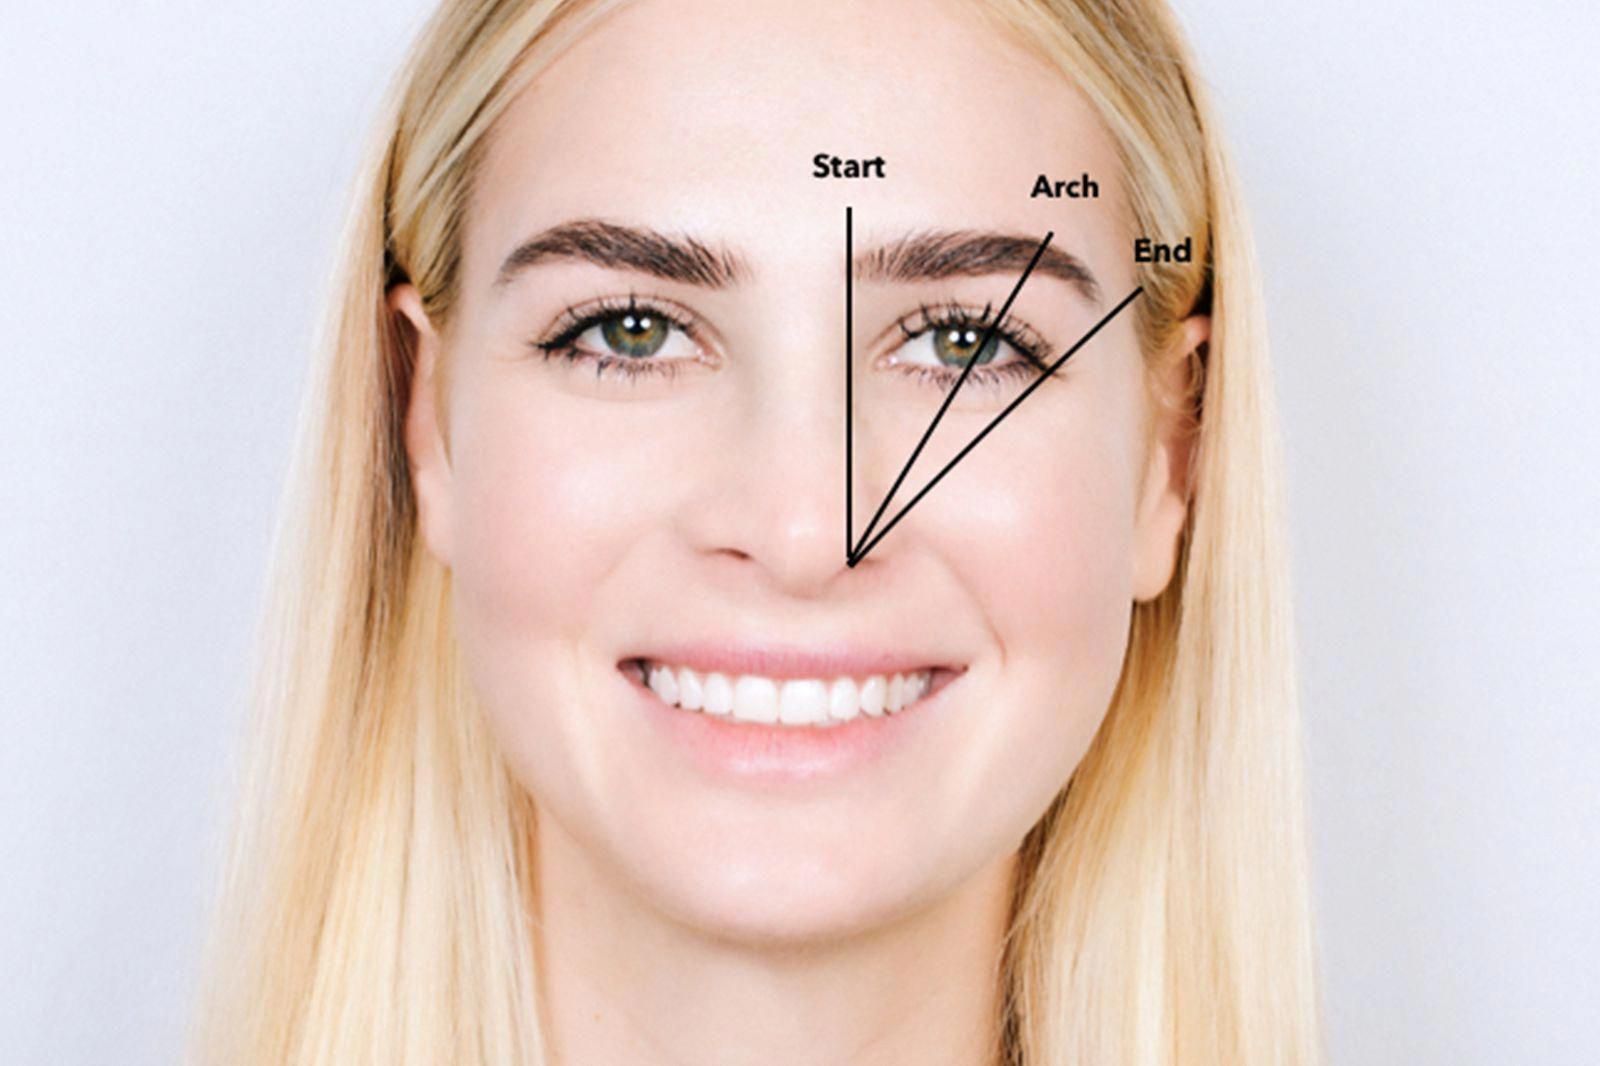
Brow Basics for Balance: Before zeroing in on face shape, lock in the fundamentals that create flattering, polished eyebrows. Start with classic brow mapping: the brow should begin in line with the bridge of the nose, the arch should peak just beyond the iris, and the tail should end where a diagonal from the nostril meets the outer eye corner. Aim for gentle symmetry, but remember that brows are sisters, not twins. Choose thickness that echoes your features; fuller brows often soften strong lines while slimmer brows can refine delicate features. Keep the fronts soft with a light gradient, and avoid boxy squares. Use hairlike strokes with a fine pencil to fill sparse areas, then blend with a spoolie. Keep trimming restrained to the very tips to prevent gaps. Whether you prefer tweezing, threading, or waxing, remove a few hairs at a time under good light. Finish with a flexible brow gel to set direction and a subtle highlight along the brow bone for lift.
Round Face Shape: The goal for a round face is to introduce subtle verticality and definition. A softly elevated arch adds dimension, creating the illusion of more length through the face. Keep the brow body medium to full, especially at the head, then taper with a clean, refined tail. Avoid overly rounded shapes or very flat brows, which can echo facial curves or compress features. Map the arch slightly past the center of the iris for lift, but keep edges feathered to prevent harshness. Extending the tail a touch outward, not downward, adds width without dragging features. Refine the underside line with light strokes for crispness, then blend the top edge for softness. If your eyes are close-set, keep more lightness at the fronts; if they are wide-set, bring the fronts a bit closer while staying natural. Finish with a light, buildable powder to diffuse color and a flexible gel to keep hairs lifted without crunch.
Oval Face Shape: An oval face is naturally balanced, so lean into a soft, natural arch that follows your bone structure. Keep thickness moderate, avoiding extremes that overpower or disappear. The ideal shape has a gentle rise and a gradual taper, echoing the smooth lines of the face. Focus on clean undercurves with minimal removal above the brow to preserve fullness. Create dimension by shading the brow's center slightly deeper than the head and tail, maintaining a breathable gradient. For fullness without heaviness, layer a tinted gel over a microfine pencil, mimicking hair with short, upward strokes. Avoid ultra-high peaks or razor-flat lines; both can disrupt harmony. If your forehead is prominent, slightly soften the arch by rounding the peak; if your features are delicate, keep strokes extra fine. Groom with a spoolie angled upward and slightly outward to lift, and add a whisper of highlight on the brow bone to maintain light without sharpening edges excessively.
Square Face Shape: With a strong jawline and angular features, the mission is to balance structure with softness. Opt for a fuller brow body and a softly curved arch with a defined, not sharp, peak placed just beyond the iris. This adds graceful lift while nodding to your face's strength. Keep the fronts diffused to avoid a blocky start that can compete with the jaw. Refine the underside for clarity and use feathery pencil strokes through the top to keep it airy. Avoid harsh, overly angled forms or downward-tilted tails, which can weigh the face. Choose a shade that matches your root color or is slightly softer to prevent heaviness, and blend with a spoolie for a seamless finish. If your forehead is wide, a touch more thickness at the heads can balance proportions. Set with a flexible gel brushed upward then outward to maintain movement and a lifted silhouette that flatters square contours beautifully.
Heart Face Shape: A heart-shaped face, with a broader forehead and narrower chin, looks best with brows that soften the upper width and harmonize proportions. Choose a low to medium arch that is smooth and rounded rather than steep, keeping the peak gentle. Maintain a moderate thickness that gradually tapers, ensuring the tail does not drop below the front line. Keep fronts airy to avoid crowding the center, allowing the eye area to stay open. Avoid ultra-high arches or extra-long tails that amplify the forehead or narrow the jawline further. Map carefully to land the peak slightly past the iris, and emphasize feathered strokes for a plush yet controlled look. A tinted gel can lift fine hairs and create fluffy softness without heaviness. If your temples are prominent, keep the tail neat and slightly shortened. Add a subtle brow bone highlight and a touch of matte shadow just above the arch to create gentle, flattering balance.
Long or Oblong Face Shape: To complement a longer face, aim to visually add width and minimize vertical emphasis. Flatter brows with a subtle, low arch achieve this effect beautifully. Build a consistent thickness through the body, then extend the tail slightly outward to widen the eye area without drooping. Avoid pronounced peaks or highly arched shapes that lengthen the face further. Keep fronts diffused and the underside clean for a streamlined silhouette. If the space between brows is wide, bring them a touch closer with soft shading to decrease the appearance of length. Use a fine pencil to structure the baseline, then layer powder for soft fill and lock hairs in place with a flexible gel brushed outward. Maintain alignment by checking your profile; the tail should feel horizontal, not slanted down. A restrained highlight along the brow bone lifts without adding steepness, preserving a horizontal, face-widening impression.
Diamond Face Shape: Diamond faces are widest at the cheekbones, so brows should soften the center width and create a graceful focal point. A gently curved arch with a rounded peak helps diffuse sharpness, while a medium thickness maintains presence without overwhelming. Keep fronts slightly closer if eyes are wide-set to anchor the gaze, and blend transitions carefully for a seamless gradient. Avoid dramatic, angular peaks or thin, pinched tails that emphasize width. Define the underside with precise strokes, but feather the top edge to keep lift without hardness. If temples are narrow, allow a touch more volume at the outer third before a delicate taper. Use a cool- or neutral-toned pencil to mirror natural shadows, then soften with powder for dimension. Brush hairs up and slightly outward to open the eye area. Finish with a lightweight gel to set texture, preserving a plush yet controlled silhouette that flatters the diamond structure.
Triangle or Pear Face Shape: With a broader jawline and narrower forehead, your brows can guide attention upward to balance proportions. Choose a slightly higher arch positioned toward the outer third to lift the eye and visually widen the upper face. Keep thickness fuller at the head to add presence where it is needed, then taper to a refined tail that extends outward, not downward. Avoid ultra-flat brows or drooping tails, which concentrate weight low on the face. Define the underside for clarity and keep the top edge softly feathered to prevent heaviness near the temples. If your brow hairs are sparse, layer a tinted gel over micro-strokes for structure plus fullness. Maintain a gentle gradient at the fronts to keep the center bright. For care, exfoliate lightly around the area between grooming sessions, use soothing aftercare if you wax or thread, and let over-tweezed patches rest while you fill with soft, hairlike strokes for a polished, face-lifting finish.